It has never been easier for us guitarists to record ideas or songs within our own four walls. 30 years ago you had to book an expensive studio to get a professional sound. With the tools available today you can let your creativity flow in the comfort of your home. However the selection is so vast that it’s easy to lose track. That’s why I’d like to show you a few ways to record your electric guitar at home – without getting into trouble with your neighbours!
The Basic Setup
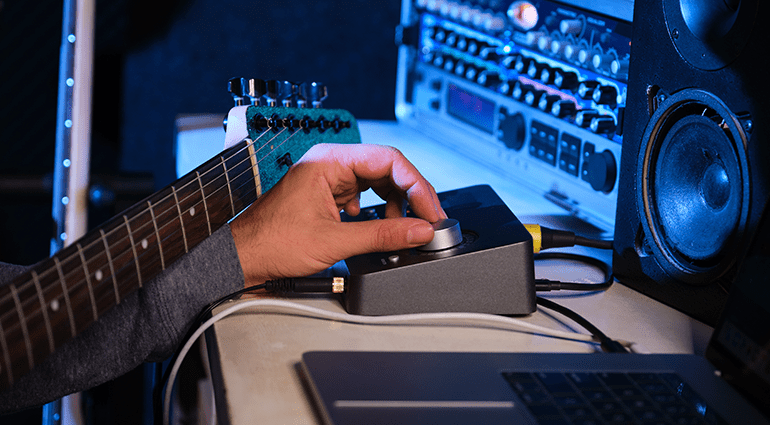
Of course, there’s nothing wrong with recording on a smartphone, tablet, or stand-alone recorder, such as the Zoom H6. However, you’ll achieve the best results with a computer and so-called DAW software, which stands for “Digital Audio Workstation.” The DAW is your recording hub that allows you to record and edit multiple tracks, apply effects, and add software instruments and plug-ins.

Which software you use is entirely up to you. Popular DAWs include Presonus Studio One, Steinberg Cubase, Ableton Live, Apple Logic, or Avid Pro Tools. It’s worth looking through a manufacturer’s complete product range because there are often affordable, slimmed-down “light” versions in addition to the more expensive full versions. If you are a pupil/student or teacher, you can sometimes get an educational version at a discount.


In many cases, you will need an audio interface to plug your microphone or guitar into. The quality of the interface depends on the built-in preamps and AD/DA converters. However, you don’t have to use a high-end product to achieve good results. Manufacturers such as Focusrite or M-Audio offer affordable, tried-and-true solutions.


1. Use a Power Attenuator to Mic Your Amp
Using a microphone to pick up a guitar amp is certainly the most common method, which is also predominantly used by professionals. However, this is often difficult in a rented flat. Many amps simply cannot deliver their full sonic potential at low volume levels.

This is where so-called “attenuators” can help. These are inserted between the amp head and speaker. Now you can easily turn down the overall volume of the amp even if the head is cranked all the way up. Then simply place a standard dynamic microphone, such as the Shure SM57 or the Sennheiser E906, in front of the speaker.
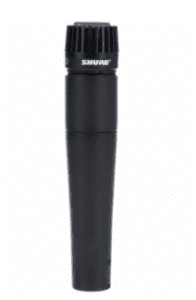
Of course, you can also use ribbon or condenser mics, although the latter require phantom power. To find the optimal sound, first locate the center of the speaker, position the microphone a few centimeters in front of the grille, and point it directly at the speaker cone. If the sound is too harsh and treble-rich, experiment with moving the microphone towards the edge of the speaker. Different microphone angles also have a major influence on the sound. Try it out until you get the sound you want!

2. Isolation Cabinet
If the sound from your speaker is still too loud for your neighbours, you can also use a so-called isolation cab. This is a closed, soundproof wooden box with a built-in speaker and a microphone mount. The downside is that the closed construction can sometimes affect the sound, and you need to apply EQ to compensate. Some manufacturers of Isolation Cabs are Grossmann and Rivera.
3. Load Box Plus Speaker Simulation
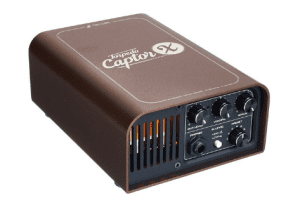
If you want to record a real amp but cannot use a microphone, speaker simulations are your best bet. These emulate the sound of a miked-up cabinet using special frequency curves. This can either be done with analog filters or digitally with so-called IRs, which stands for Impulse Responses. However, remember that operating an amp head without a speaker requires a load resistor to be connected. Fortunately, many manufacturers offer products that combine a load box and speaker simulation.

Analog solutions are available from Palmer or Fryette, while the Universal Audio OX and various products by Two Notes rely on digital IRs. Another option would be a simpler load box with a DI output, such as the Two Notes Captor. In this case, the load box provides the required resistance and you can feed your signal directly into the DAW and use a software-based speaker simulation. If you have a modeller, you can also use it for this purpose by deactivating the amp section and only using the cab module. However, always keep in mind: A load resistor must be connected to the speaker out of your amp!

4. Modellers, Profilers, and Guitar Preamps
Digital modellers that include both amp and speaker simulations are certainly one of the most convenient solutions for recording an electric guitar at home these days. As many amp modellers connect directly to the computer via USB, you don’t even need to purchase an additional audio interface. Modelling complex amplifier circuits requires a lot of processing power, which is why the sound quality is often directly related to the price of the modeller. Some all-in-one modellers also offer built-in effects, while others focus on digitally recreating the amp and cabinet. Affordable solutions include the Harley Benton DNAfx Git or the Hotone Ampero.


In the higher price range, you’ll find devices like the IK Multimedia Tone X, the Strymon Iridium, various Universal Audio pedals, Line 6 Helix, the Neural DSP Quad Cortex, or the Kemper Profiler.


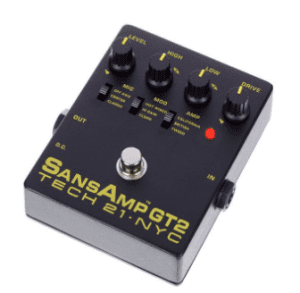
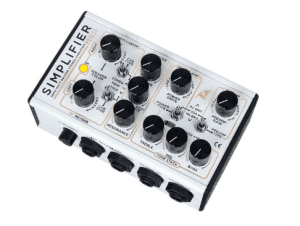
An analog option would be a pure preamp equipped with a speaker simulation. Popular products include the SansAmp series from Tech 21 and the DSM & Humboldt Simplifier.
The mixture of analog preamps with digital convolution technology is also a clever option. This can be found, for example, in the Friedman IR-X or IR-D models.


5. Guitar Plug-Ins
Amp modelling plug-ins have really come a long way. The gap between hardware modellers and pure software solutions has narrowed noticeably in recent years, making plug-ins a convenient alternative. However, you’ll need a good audio interface and a reasonably powerful computer if you want to have fun playing. Make sure to activate software monitoring on the audio track used for recording. If you hear a lot of latency, you need to reduce the buffer size in the audio settings. At 44.1 kHz, a buffer size of 128 samples results in about 2.9 ms of latency. This is absolutely tolerable and corresponds roughly to the time it takes for the sound to travel through the air when you stand at a distance of one metre from your amp. Popular software solutions include, for example, the Archetype series from Neural DSP, IK Multimedia Amplitube 5, Native Instruments Guitar Rig 7, the Bias FX from Positive Grid, or amp modelling plug-ins from Universal Audio. However, the latter are not yet available natively and only work in combination with UAD cards or Apollo interfaces.

At 44.1 kHz, a buffer size of 128 samples results in about 2.9 ms of latency. This is absolutely tolerable and corresponds roughly to the time it takes for the sound to travel through the air when you stand at a distance of one meter from your amp. Popular software solutions include the Archetype series from Neural DSP, IK Multimedia Amplitube 5, Native Instruments Guitar Rig 7, the Bias FX from Positive Grid, or amp modelling plug-ins from Universal Audio. However, the latter are not yet available natively and only work in combination with UAD cards or Apollo interfaces.


Feedback on Recording Electric Guitar
What experiences have you had? Do you have any other tips for other guitarists? Then feel free to leave a comment. We wish you all the best with recording your guitar tracks!


Comments 0
No comments yet.